Introduction
One of the great features in RCT is the ability to save your
own track designs so you can use them again and again in as many
parks as you like. On the internet, fan sites offer 'Ride
Exchanges' where you can upload your creations for others to
download, and of course you can download creations by other
people.
There are literally thousands of tracks out there to download.
On one of the biggest Ride Exchanges at RCTUK,
there are around three and a half thousand different tracks. Now
with RCT2 imminent, and the official site re-launched with
promises of re-opening their Ride Exchange, there are bound to be
thousands more.
So if like me you love downloading other peoples' tracks and
have built up a large collection, the problem is remembering what
they all look like!
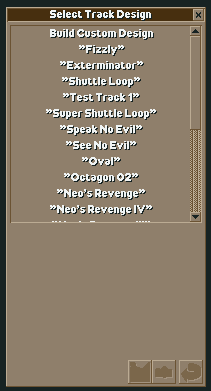  Like this example on the left, the game's ride build menus tell you their
names, but as a wise
man once said, 'A picture paints a thousand words'. And on the
same ride build menus every time you select a ride name, that
little camera button lights up to tell you that there is a
snapshot of the ride to take look at. It does light up doesn't
it? Like this example on the left, the game's ride build menus tell you their
names, but as a wise
man once said, 'A picture paints a thousand words'. And on the
same ride build menus every time you select a ride name, that
little camera button lights up to tell you that there is a
snapshot of the ride to take look at. It does light up doesn't
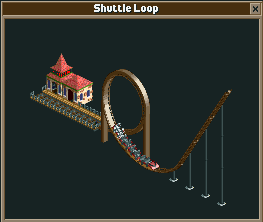
it?  . And when you click it, you get
to see a little snapshot like this one on the right don't you? . And when you click it, you get
to see a little snapshot like this one on the right don't you?
Well, no, most of the time the button doesn't light up at all.
Most of the time it looks like this  because there isn't a snapshot available. And the reason for this
is that the file format of the snapshot is completely none-standard,
and there isn't a graphics program on the planet that can make
files in this format.
because there isn't a snapshot available. And the reason for this
is that the file format of the snapshot is completely none-standard,
and there isn't a graphics program on the planet that can make
files in this format.
Wrong again! There are 2 programs in fact. RCT PiNGer by me,
rcthelp, and MakeTP4 by Patrick Campbell. But both suffer with
the same flaw. They both use the RCT screenshot files that you
can make and sure, they let you choose a snapshot sized rectangle
anywhere on the screenshot and create a file with the correct
format for RCT to use. But the problem is that RCT insists that
the snapshot sized rectangle is always 254 pixels wide and 200
pixels high, and not many rides taken from a screenshot will fit
into that sized rectangle. And neither RCT PiNGer or MakeTP4 lets
you resize the screenshot to make the whole ride fit in the
snapshot sized rectangle.
So the purpose of this article is to tell you how can solve
this problem, and in 10 steps make RCT Ride snapshots that always
contain the whole of the ride. All the software used is available
free of charge from the internet, and links are provided for
places where you can download it.
Before we go any further, I'll make an assumption. You have
created your ride design or downloaded a track from a Ride
Exchange somewhere, and the track design is in your RCT Tracks folder.
Here's the steps
- Use a completely flat workbench park in the game and use
the game ride build menus to place your ride in the
centre of the flatland. RCT2.com doesn't have any
flatland parks for download (yet), you can find one for
your version of RCT (original, RCT+AA/CF or RCT+LL) all
over the net. I'd recommend RCT Station because I'm a
staff member there! Check out their flatlands at this link. Note that for some
workbenches, you need to patch RCT with the Drexler patch
available from this link.
- Just to complicate things even further, the game might
tell you that it "Can't construct this here"
when you try to place the ride on the flat. That's
because originally the ride either tunnelled or was built
on the side of a hill, and by placing it on flat land, it
is going to be too high for the track supports. In this
case, you're going to have to rebuild the track piece by
piece, adjusting the flatland terrain to make the track
fit. Sounds complicated? Well just download RCT Track
Decoder by Greg Wolking from this link, and that will give you a
piece by piece description of your track to help you
rebuild it. It's a useful program to have for helping get
tracks into flatlands and taking snapshots, but it is
even better for building any ride you like in any park
you like! [If all of this sounds way too complicated,
just use the ride in the park where you created it. To
get the best screenshot to make a snapshot, do a save and
then delete all scenery theming, paths and other rides
around the one you want to 'snapshot'.]
- So the flatland doesn't have any scenery or paths right?
And notice how the snapshots that come with the game have
a black background? Want to do the same thing? Just press
the <H> then the <V> key on your keyboard. [Note:
This only works if you have the Loopy Landscapes add-on,
and isn't actually necessary, it just gives the same
effect as the game snapshots.]
- Get the ride so that it appears in the centre of the
screen, and from the floppy disk icon on the game menu
 select Screen Shot. You might like to do
this a few times using the different zooms in the game or
the different full-screen resolutions. But whenever you
do, make sure that the whole ride is in the screenshot.
Each time you do a screenshot, make a note of the file
name that RCT displays. It will be SCR<xyz>.PCX (where
<xyz> is some number or other) and it has been put
in the same folder as where your RCT is installed. That's
it, you're done with RCT now, you can close it down and
get some of that valuable memory and system resources
back. You might need them! select Screen Shot. You might like to do
this a few times using the different zooms in the game or
the different full-screen resolutions. But whenever you
do, make sure that the whole ride is in the screenshot.
Each time you do a screenshot, make a note of the file
name that RCT displays. It will be SCR<xyz>.PCX (where
<xyz> is some number or other) and it has been put
in the same folder as where your RCT is installed. That's
it, you're done with RCT now, you can close it down and
get some of that valuable memory and system resources
back. You might need them!
- Start up the completely free, Image editing program
IrfanView. It's one of the most downloaded image programs
on the net, it's a small download, and you can get it at this link.Once you've downloaded it,
installed and started it up, load the SCR<xyx>.PCX
file of your choice.
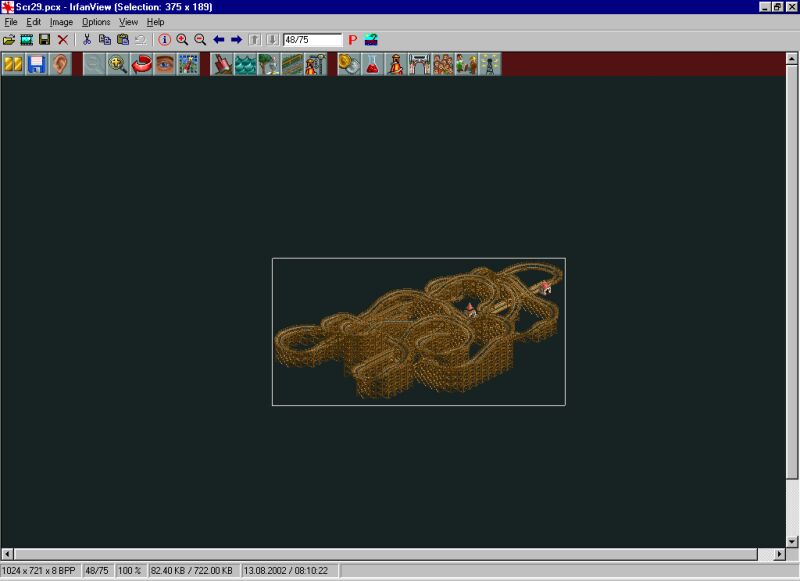
- With the mouse, click and drag a rectangle shape so that
it is just wide enough and just tall enough to surround
the picture of your ride. Here's an example.
Click on the image for a bigger view. . You can find out the size of the rectangle in the title bar of IrfanView like this.  Now you need to slightly change the size of the rectangle
so that it is one of these dimensions. Now you need to slightly change the size of the rectangle
so that it is one of these dimensions.
| Width |
Height |
|
Width |
Height |
|
Width |
Height |
| 254 |
200 |
|
508 |
400 |
|
762 |
600 |
| 267 |
210 |
|
521 |
410 |
|
775 |
610 |
| 279 |
220 |
|
533 |
420 |
|
787 |
620 |
| 292 |
230 |
|
546 |
430 |
|
800 |
630 |
| 305 |
240 |
|
559 |
440 |
|
813 |
640 |
| 318 |
250 |
|
572 |
450 |
|
826 |
650 |
| 330 |
260 |
|
584 |
460 |
|
838 |
660 |
| 343 |
270 |
|
597 |
470 |
|
851 |
670 |
| 356 |
280 |
|
610 |
480 |
|
864 |
680 |
| 368 |
290 |
|
622 |
490 |
|
876 |
690 |
| 381 |
300 |
|
635 |
500 |
|
889 |
700 |
| 394 |
310 |
|
648 |
510 |
|
902 |
710 |
| 406 |
320 |
|
660 |
520 |
|
914 |
720 |
| 419 |
330 |
|
673 |
530 |
|
927 |
730 |
| 432 |
340 |
|
686 |
540 |
|
940 |
740 |
| 445 |
350 |
|
699 |
550 |
|
953 |
750 |
| 457 |
360 |
|
711 |
560 |
|
965 |
760 |
| 470 |
370 |
|
724 |
570 |
|
978 |
770 |
| 483 |
380 |
|
737 |
580 |
|
991 |
780 |
| 495 |
390 |
|
749 |
590 |
|
1003 |
790 |
| 508 |
400 |
|
762 |
600 |
|
1016 |
800 |
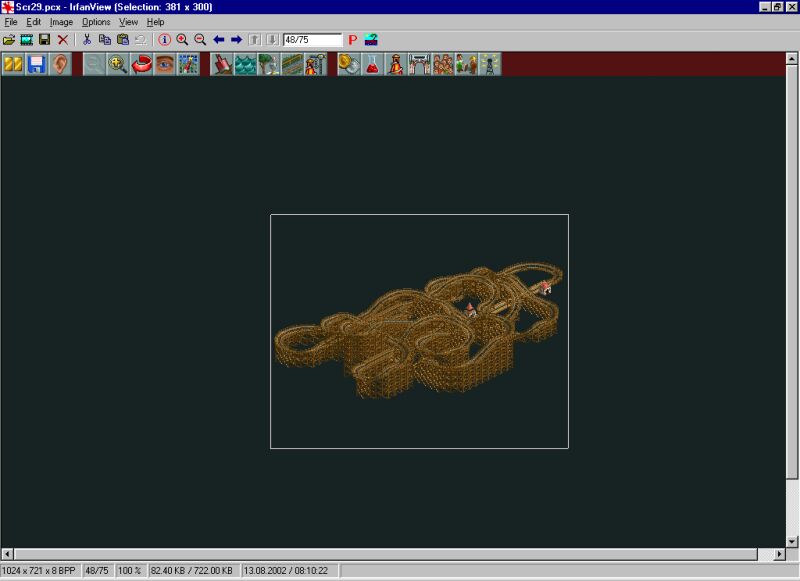
You can change the dimensions by moving the mouse over one of the rectangle borders until a  or or  cursor appears, then clicking and dragging. cursor appears, then clicking and dragging.
This is an example of where the rectangle has been sized to fit one of the dimensions. Care has been taken to make sure that the ride still stays within the centre.
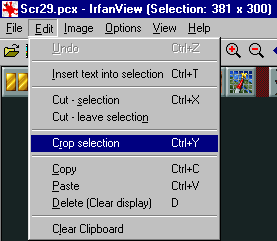
When you have it the correct size, select Edit Crop
Selection from the IrfanView menu.
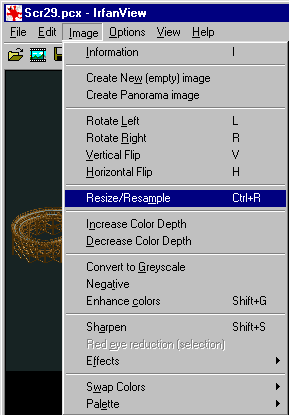
- What we have now is an image that contains the whole
ride, and in the correct proportions. However, it is
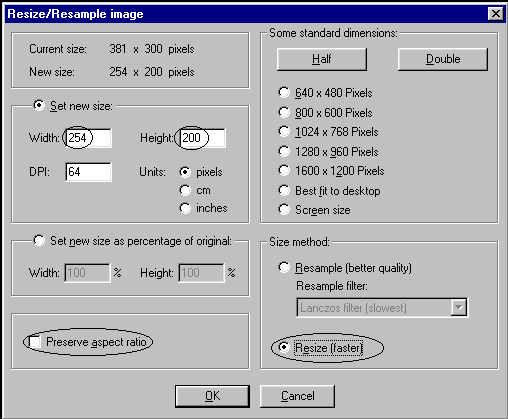
still not the correct size of 254 wide and 200 high. So in IrfanView select Image
Resize/Resample.
You need to change the contents of the
dialog box that appears to look like this.
It's REALLY important to select resize here, and NOT
resample. Resample gives you a much better image in
IrfanView, but it won't display properly in RCT. It's all
to do with the way RCT uses palettes and far beyond the scope of this
article. It is also the reason why you must use the screenshots produced by the game, and not by any other screen capture utility that you might have, as your starting point.
- Save the image as a PCX file and close down IrfanView.
- Now start up either MakeTP4 or RCT PiNGer and use it in
the usual way to create a TP4 snapshot file. You can
download RCT PiNGer from this link and MakeTP4 from this link. (RCT PiNGer is a much
larger download, but it does contain extra functions for
creating various image formats of different sizes.
Bearing in mind that you have just downloaded IrfanView,
despite the fact that I wrote RCT PiNGer, I'd recommend
that you use MakeTP4. Save the snapshot in your RCT
Tracks folder. It MUST have the same name (before the TP4
bit) as the track file.
- Shut down MakeTP4 or RCT PiNGer. That's it you have done
it!
To test this out, start up RCT again. As long as you just did
everything right, you'll have an little illuminated camera icon
the next time you decide to build your ride. What is more, at
some of the Ride Exchanges out there, you will be able to include
the snapshot with your ride when you submit it, so less and less
people will need to go through these 10 steps!
|